2017-08-02

15 for 15: Ælfwynn the scribe

So many things have happened since my last post! I haven't kept up with my BuJo = a lot less things are getting done on the blog.. I have kept VERY busy though!

I entered Nordmark's Principality tournament with Herr Krake.. and we WON! So since Doublewars I've been the Princess of Nordmark. A somewhat strange feeling after over 15 years in the Society.. but a lot of fun and a lot of work!
I set a goal for myself to start doing scrolls again, and since becoming Princess I've made 8 thus far!

V.ä.V. in Gyllengran

2. The Hare of Nordmark: Ossi Orava (Ossi Nash)
I made the calligraphy and Siiri Hyvämieli made the illumination. She won my choice in the blank scroll competition at Double wars and is actually Ossi's big sister :)
He got The Squirrel of Nordmark (children taking part)
.............................................................................................
3. The Unicorn of Nordmark: Siiri Hyvämieli ( Siiri Nash)
Together with my daughter Tuva (Beatrix Gareysin) I made this scroll for Siiri. Tuva made the illumination and I the calligraphy. The Unicorn of Nordmark is an A&S award for children and she got it for her illuminations.
The original on top: Galloping Unicorn by Brunetto Latini ("Li Livres dou Trésor, Rouen" ca 1450-80
Tuva's version on the bottom
A bling M by Tuva

.............................................................................................

4. The Order of The Golden Ribbon: Styrbjörn Bärsärk (Peter Mellbin)
A Golden Ribbon (service in the Principality) for long time overdue Styrbjörn Bärsärk (Peter Mellbin). Classic Celtic which I added simple text to.


.............................................................................................

5. AoA Astrid Kajlung (Malin Lannerhed)
A 14th c lovers knot for Astrid Kajlung's (Malin Lannerhed) AoA
Gold dots all around

Other awards given out at VäV by us:
Golden Ribbon for Orm av Gyllengran (Illuminated by ristina Petersdotter and Calligraphy by Agnes Odygd)

.............................................................................................

Cudgel war in Aarnimetsä

Golden ribbon for both Ludvig af Eke and Blenda af Nääs. 
Both scrolls made by the Baroness of Gotvik Aleydis.

.............................................................................................

Medieval week in Styringheim

TUESDAY COURT

6-7. Unicorn of Nordmark for Linnéa and Lovisa Weydehartz
I made them mirrored because they are twins. Tuva has made the illumination (except the Golden L) on Lovisa's scroll and the unicorns on both and I've made the rest.
Nordmark's unicorn is a a&s award for children. I also have them matching sewing kits made by (will add later)

The original from a Book of hours (will add the info after I get back from Visby..)

Other awards given out at Tuesday court:
Order of the Light: Viscountess Wilda Frejasdottir (scroll by Countess Agnes Odygd, Token by Countess Jovi Torstensdottir)

Backlog LjO for Viscountess Elise M'Gillone


FRIDAY COURT


Remember to send your recommendations!!


YIS

2017-04-11

15 for 15: Headgear

Lately I've started on the HEADGEAR portion of the 15 for 15 challenge I've set myself.. I've made one list of things I've thought of.. this might not be the final list though.. I planned on making a D-veil in this wool.. but instead I cut out a round one..


1. THE BIRGITTA CAP
 
1. Cap from Maciejowski bible 1240s
2. 3 more caps from the Maciejowski bible 1240s
3. Detail from Tacuinum Sanitatis 1370-1400
4. Birgitta's cap during conservation after the silk cover was removed, as published by Aron Andersson and Anne Marie Franzén in Birgittareliker.

Birgitta caps can be seen in various illustrations from the middle ages. It's called a Birgitta cap due to an original medieval cap (dating between 13th and 16th century) kept at the Birgittine Convent in Uden, The Neatherlands. It is believed in belonged to the Swedish saint Birgitta.

An EXCELLENT post about the cap is on Isis Sturtewagen's blog Medieval silkwork.

It's a VERY practical piece of headgear that keeps your hair in check (and hidden even when you have a bad hair day..) and you can pin your veils and other head coverings to it.

There are PLENTY of patterns out there, but my favourite is the one by my good friend, and textile curator at The City Museum in Gothenburg, Gunilla Andersson. (NOT to be used for commercial gain!)

 
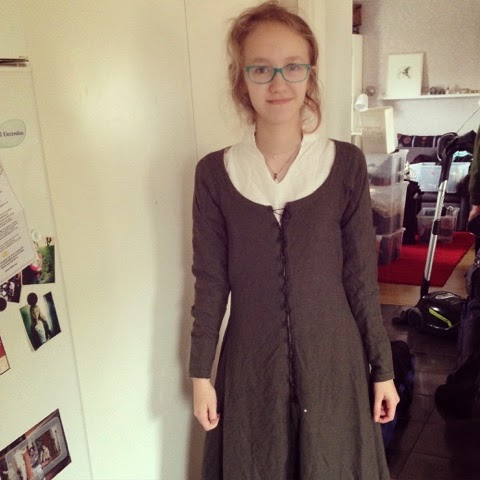
The finished Birgitta cap with the strap long enough to go two times around my head.


The top has been sewn with a tiny running stitch. I used a black thread to gather the fabric at the bottom. (Ignore the sewing machine.. only used as a lamp..) 
Adding the strap. I made this thinner than the original since I wasn't adding any embroidery on this cap.
 
Felling all the seams (should have done this before adding the strap though..) 
The straps are tricky to get the right length.. first I measured and it was PERFECT! Sewed it together and it was too small! Added the piece missing at it was too long! Now a third adjustment and it's perfect! 

LESSONS/CHANGES
Start with longer straps and pin it the correct length whilst wearing it..
Fell the top seams before adding the strap
I will also make an embroidered version.

MATERIALS:
White 125g linen (Linnehem.se)
35/2 white linen thread Bockend (sold by me 55sek/roll)


2. THE GEFRENS
Now here's something I've been wanting to make for quite some time!!
This first version is a classic: use what you've got! (The recycle series)

First things first..
 
1. Barbara Von Erlach with daughters ca 1480 (Schilling) 
2. The Bern Chronicles vol. 3 1478-1483 (Diebold Schilling)
3. Mechthild Von der Pfalz 1452 (Hans Ingeram)
4. Can't find the original source..
5. Medieval woodcut, can't find original source..
6. Detail from "Niederwildjagd" after 1489, (Housebook Master of castle Wolfegg, South Germany). The fringe is very wavy here!

A gefrens is a head decoration often found in paintings depicting German women from the 15th and early 16th centuries.
It's basically a cord/ribbon with a fringe covering your neck from ear to ear.
A lot of my friends who make them weave the ribbon and add longer weft for where they want the fringe. I've also seen people using cords/strings and adding their fringe to that instead.

Anywho.. some years back, when my hair was still dark red and not a soft pink, I found a fringe used for furniture or tapestries.. and I thought "I could use this for a gefrens!"..
Now, 5-6 years later it finally happened!

 
Before: common wool fringe
After: a curly gefrens! 
It was too wide at first so I needed to narrow it a bit. Since I already cut the "sausages" I had to trim it by the fastening points. The cord isn't fastened in its original state so I could just pull until I got the length I wanted.

LESSONS/CHANGES
On the next one I know the width I need and I will also try and straighten the yarn for the fringe somehow. Although there are some pictures with a wavy/somewhat curly gefrens.. (pic above)

MATERIALS:
Ca 30cm wooden fringe (5sek/m)
Fastened with dark red Gütermanns sewing silk


3. THE FALSE BRAIDS
Having switched from "acceptable" hair colour to a soft pink.. and also lacking the proper length of hair.. I wanted/needed some fake hair, and not the synthetic kind..

I've always admired Elina's (Neulakko.net) linen flax braids so that's what I set out to make.

Finding linen flax.. that can be really REALLY expensive!! Unless you have a plumber supply store near by.. or in my case, Biltema ;)

Craft store: 4-600 sek !! 
Biltema:  VVS-lin 26,90-29,90 sek

The Biltema price made me ok with buying the flax just to try it and if it didn't work it wouldn't be the end of the world :)

I bought the roll with 80g of linen flax.
 
I divided the roll in two parts and then folded them so I had three "strands" that I could braid.
The smell is.. interesting.. so I left them hanging outside for a while.. I will make a lavender lined bag for them in the future though..
 
I held the braids folded) from slightly over my temples to decide on the length I wanted.. then I cut the extras off.. I could have calculated this to begin with.. but with such a tiny price tag I didn't bother!
I cut off a ribbon in proper length (I've misplaced my linen tape so this off white cotton had to do this time..) and marked where the braids should go.
Since I want to be able to adjust the braids to different hairstyles I'm not wrapping them together like Elina's or like the London finds (Textile and Clothing page 132). I will however make a linen flax cord for them so that I can wrap them when I want that look.
I chose to make mine much thicker than the findings too, but that's just the look I was after. (I also want to make a zopfe in the future too!)

If there are ANY doubts these braids are mine.. I added a little tiny invisible detail.. a winged skull 💀
You can also see the stitches better on the ribbon. I sewed tiny stitches straight through the braids to keep them in place.

LESSONS/CHANGES
I'm happy with these but I want a better ribbon next time.. perhaps even try to weave a silk ribbon!
Also contemplating making a wulst or zopfe with thick braids too.. easy material to work with, but it gets everywhere!!

MATERIALS:
80g linen flax (VVS-lin) 29,90sek (Biltema)
35/2 white linen thread Bockens (sold by me 55sek/roll)
Tiny bit of golden buttonhole silk


4-5. CIRCULAR LINEN VEIL AND WIMPLE
Done, post to come..
A circular veil and wimple
Elina Sojonen's - of neulakko.net - excellent post with simple pattern, the one I've used! (yes, she will be mentioned quite a bit throughout this blogpost because she's awesome at this!)

LESSONS/CHANGES
I want to make as pretty hems as her Excellency Aleydis..
No changes needed to Elina's excellent "pattern". Works GREAT!

MATERIALS:
1m (146cm wide) very thin almost silky linen
60/2 linen thread Bockens (sold by me 55sek/roll)


6-7. CIRCULAR WOOL VEIL AND WIMPLE
Cut out veil
Wimple done (by the Baroness Aleydis of Gotvik since she ran out of things to do at the sewing weekend I hosted..)

LESSONS/CHANGES


No changes needed to Elina's excellent "pattern". Works GREAT!

MATERIALS
:

1m (ca 146cm wide) wool muslin from medeltidsmode.se
Offwhite sewing silk from Gütermann

8. Veil pins

9. Birgitta cap with embroidery

10. Rectangular (long) veil

11. Wulst 

12. Steuchline (striped?)

13. New German hat

14. "Fruhätta" with fur lining

15. Open hood without lire pipe

16. Veil with sewn pleats

17. Frilled veil

(yes I know I said 15 but a wish list is just that.. a WISH list..)


YIS

Lady Æ

15 for 15


And so it was that 15 years ago, this January, that I, and my eldest daughter T1 (Lady Beatrix these days), joined the group of SCAdians residing in the area nowadays known as the Barony of Gotvik :)

It has been a glorious time (with a few months here and there missing) and to celebrate this, and push myself I set the bar high and aim to complete 15 different tasks in 15 categories (yes some might overlap..


THE TASKS
  1. 15 pieces of largesse/favors (to be given to crowns to give out or by me) 1:15 done
  2. 15 bags 0:15 done
  3. 15 pieces of headgear 6:15 done
  4. 15 pincushions 0:15 done
  5. 15 pieces of decorations 0:15 done
  6. 15 dragons 0:15 done
  7. Try making 15 medieval dishes 0:15 done
  8. 15 blank scrolls 0:15 done
  9. 15 articles for Baronial Dauphinen, Principality's Silversparren or Kingdom's Dragon's tale 0:15 done (2 started on though)
  10. 15 blogposts 2:15 done
  11. 15 pieces of 14th c garb 2:15 done
  12. 15 pieces of 15th c garb 1:15 done
  13. 15 pieces of 16th c garb (i.e. "The red dress of DOOM".. although I have decided it deserves a better fabric than the one I've got..) 0:15 done
  14. 15 award tokens (I also started the "100 award tokens before Double wars" event on Facebook.. link will come..) 0:15 done
  15. 15 award recommendations (this is already completed and I recommended 31 people of awesome this time. Some have already received the awards too!) 31:15 done!
Bonus track from my "fans"/cheerleaders of doom..
  1. Try 15 different meads
  2. Make 15 different pancakes
  3. Visit 15 events
  4. Display/Compete in 15 A&S displays/competitions
  5. Learn 15 medieval dances
  6. Help 15 newcomers (np!)
  7. Host 15 SCA meetings in Halmstad (on the way!)
  8. Get to know 15 newcomers at events (great idea!)
  9. Learn 15 new things (some stuff on my lists are new to me..)
  10. Make 15 medieval sweets
  11. Make 15 medieval sewing needles
  12. Write 15 thank you letters/notes

As I make the blogposts about the different categories I'll link them here too :)

YIS

Lady Æ

P.s. Started with a Bullet Journal as some of you may recognise.. DRUG!! D.s.

2016-06-17

A pilgrim's bag

Background
Well I've been wanting a non belt mounted bag for many years now.. and I've made 5 or 6 of them.. but none for myself.. And then this Heraldry challenge popped up on Facebook and I thought "why not combine the two..?!". Making a pilgrim bag with my device on the lid.

Research
First things first.. I know what other people's pilgrim bags look like.. but what historical references are there..?!
I turned to Google and to Pinterest.. and some of my books as well..
Made a sketch of the different types I found (spanning ca 1100s-late 1400s) and the styles I liked..
Since I wanted a somewhat shield shaped lid I went with that style, and I liked the bags where the shoulder strap went down the sides of the bag..
The research can also be found on my Pinterest: Garb -  purses bags baskets

Materials
Outer layer: thick red wool
Inner layer: dark grey costume wool
Thread: red sewing silk from Gütermann
Wings/pointed point: White raw wool, grey filament silk from the 50s (grandmother Ingrid's old stash)
Finger loop braid and tassels: wool yarn.. oh and a white skull made of bone.. because.. SKULLS!

Construction
I would love to, some day, weave the band for this.. but this time I made it out of a lovely wool fabric that actually used to be my apron dress.. The wool is too thick for that and this turn me into a cylinder.. not making me want to Viking ever again! So I thought I'd better turn it into something I would like :)

I took a piece of paper and cut it to a size I thought would work for me.. actually held it up to my hip and checked it out in the mirror ;D then I decided on the thickness of the sides/strap. After that was done I drew it out on the fabric. (25x80cm including seam allowance, strap is 8x178cm) I cut the edges off on the lid to make the shield type shape..
Then I placed that on the lining (the thin dark grey costume wool) and cut that out as well.

I decided to bag line the bag since it was quicker.. In hindsight.. perhaps it wasn't.. but anyway.. I pinned down all the sides to keep them in place while making the rest.

After that folded the strap fabric (8x178cm) lengthwise and just whipstitched it together, then I attached the sides/strap.. leaving the bottom of the strap open for the tassels later..

Now to decide on the wings.. (My device ca be found in this post)
I turned to my Heraldry folder on Pinterest where I have loads of wings! But no.. then I started looking through my Pelican inspirations in my Drachenwald folder on Pinterest.. and there it was! Most likely a religious embroidery piece with absolutely NO INFORMATION!! I've messaged the original Pinner for more info since my image search has come up empty..

Photo can be found HERE!

I printed it out.. traced the wing, took a photo of it and emailed myself and then printed it out in the size I wanted :P easy peasy!
I wanted the wings to be layered so I redrew it and made 4 patterns.

Then I cut it out of the white raw wool (råväv) I bought from Medeltidsmode some years ago for a project I can't remember..

Still hadn't decided on the colour of silk I would do the blanket stitch in for the appliqué, so I did some tests..

I later decided on making the top part and all the feather "stems" in a dark grey filament silk, and the feather edges in a lighter grey filament silk (all from grandmother Ingrid's stash).
In the top I had to get through 6 layers of wool! Achy finger tips :P

After the first wing was done I was (still am) very pleased with my colour choices :) (though in the future I will make red ones and golden ones too!)

Then it was on to edging the lid.. My first idea was to weave an edge with a rigid heddle.. but I didn't have any thin wool in red, and I didn't want to use silk.. so I opted for a simple 4 loop finger loop braid instead and sewed that to the edge. (I'll make a finger loop post some other day..)
Before I attached that I made a small loop that I saw on Elin's page that I though was brilliant! This goes around the centre tassle on the bottom and closes the bag :D Simple yet fantastic!

Then we come to the final bits.. tassels! Perfect to do in front of the tv while watching a movie :)
Took a smaller box from the recycle bin and cut it the size I wanted. Wrapped the wool 50 times and tied a string on top.
Then I cut them all off and wrapped another string to make the ball on top.. (can't find the good blog post I used to look at for this.. so I'll make my own some other day..)

And me being me.. I had to attach a little something something to the centre tassel :D

So there you have it :) 
My first pilgrim's bag (for ME) and a Heraldry challenge all wrapped into one!

Links to other people's bags I've looked at:
there are more.. but these will do for now :)


2016-06-11

A long time coming..

Well this hasn't been updated in a year.. I promise I do make stuff!

But now for something completely different :)

I finally digitized all the family's devices (for the SCA)

Ælfwynn of York
(that's me) name accepted in June 2014
Gules, a pair of wings conjoined in lure, a point pointed argent

device accepted in June 2015
Awards
Award of Arms 2003
Gyllene Bandets Orden (Golden ribbon) 2005
Orden des Lindquistringes 2008
Panache 2012
Dragon's Tear 2013
Heart of Gotvik 2017
Princess of Nordmark May 2017

Jacob Gareys
(the husband who never responded when ppl called him Axel Jäderholm anyway..)
Gules, an anvil a point pointed and in chief three mullets of six argent

name & device accepted June 2015
Awards
Award of Arms 2005
LjusOrden (Order of Light) 2015
Gyllene Bandets Orden (Golden Ribbon) 2014
St Egons Hjärta (Heart of S:t Egon) 2016 


Beatrix Gareysin
(the teenager now with the title LADY after her AoA at Double Wars)
Azure, issuant from base a sun and in chief three etoiles Or

name & device accepted June 2015
Awards
Dragon's Jewel 2010
Nordmarks Ekorre 2011
Dragon's Pride 2015
Award of Arms 2016

Anna Gareysin
(so she can play Frost whenever she wants)
Purpure, a papillion and in chief three hearts Or
name & device accepted in June 2015
Awards
Dragon's Jewel 2015
Nordmarks Hare 2016

Also found an old shield base that I played around with.. because it's fun :P
Black skull with white wings is a badge I'm thinking about for myself, on the right is the purple arm with golden goblet from my household The Purple Dragon, green poofy feather, scales for merchant and Libra and a sewing needle (it used to be a sword..)

2015-04-05

Mending continues

Really loving this iPhone app to help me be more active on the blog :D

SUNDAY April 5th
Well I continued with the mending today :)
Already done: my blue landsknecht underskirt, Birgitta cap and a small tare in one of my scrappy shifts (weaving technique see pic 1 or yesterday's post, and switched the crappy string for a nice fingerloopbraided one).
Also mended one of Mr J's shirts yesterday with weaving as well.

1. Mended shift with weaving technique (same as what I did on Mr J's shirt yesterday).
2. Fingerloopbraid with two loops of each colour. (I'll do another post with fingerloopbraides in the future..).

Well today I took on Mr J's favourite slacker pants with a hole bigger than my palm!
To work around the wobblyness I attached it to my embroidery frame.
Then I took some scrap linen and attached to the back. Didn't have any green left so dark blue has to do.
3. The mending from the back
4. Mending from the front before I attached anything
5. All edges attached with running stitch and then langette stitch to secure everything
6. All finished seen from the back

7. Before and after.

I "accidentally" did a chain stitch embroidery on the knee mending just for fun. A crowned Æ for my persona (Ælfwynn of York) so that Mr J knows to appreciate his hard working wife ;)

As a different technique I did a patch over a smaller hole.. but in a heart shape.. because it's silly, and I can ;)

2015-04-04

Spring cleaning

I finally took the time to go through all our medieval garb, and made lots of LISTS (ofcourse). Inventory well needed!
Happy list maker indeed :D

I also set aside all that needed mending.. well that was a LOT!
Most of my garb need some type of mending or alteration.. but I do use my garb a lot more than my family.. since it's part of my work wear :)

Also came to the conclusion that T1 has 1.5 dresses that work.. she's outgrown the rest.. Well the .5 she's working on altering herself *proud mother*.

I also found my old moybog dress I used to wear at my old medieval workplace in Kungälv. It has a lot of holes and lots of ware and tare.. so I made T1 try it on with great success! We need to shorten it and mend, and take it in.. but if I don't make it super tight she can wear it for many years to come :)
She also needs a new "kitchen" dress since she LOVES helping out (wonder where she gets that from..) ;) and plenty more shifts and one or two aprons.

For T2 I'm working on a 15th century short sleeve dress in a fantastic green wool from Handelsgillet. She made me use the toille fabric as a lining or she would refuse to wear it.. It is green with white hippos.. she's VERY happy ;)
I'm almost done with it. Making folds in the dress to be able to make it longer in the future. She's grown over 10cm in 1 year!
She's getting some other well needed play garb as well :)

I've already mended one of my dresses, my Birgitta cap and the blue under skirt for my Landsknecht dress.
Me in my landsknecht dress at St Egon celebration in the Barony of Gotvik in Nordmark (Kingdom of Drachenwald in the SCA). The linen underskirt showing. The queen, who usually wear her landsknecht hat with lots of feathers, couldn't for obvious reason not wear them at the event. Thus I wore a LOT of feathers to please her :)

Today (Saturday) I took on mending Mr J's shirt for the 7th time in 3 years :P
First mended some ripped seams, AND reinforced them this time. 
Then I reinforced the neck slit (halssprund) with some button stitches and an extra reinforcement with a langette covered string ca 1-1.5 cm above the bottom of the slit.
When I THOUGHT I was done I found two holes on the left sleeve (honestly, what does he do with his garb?!!)..
So I tended to them as well.

Started with attaching a linen patch on the back for stability. (Pic 1)
Did a running stitch around the holes (pic 2), and then started making "lines" (warp?) over the hole. (Pic 3) After that I started with the weft, weaving with the linen thread over the hole. I used the needle to push it tighter.
The pics are very zoomed in. It's not as visible irl :)
Mr J will also be needing loads of new garb.. :P


............
Now a quick trip down memory lane..
T1 at ca 1.5 years summer 2002


T2 at ca 7 months at DoubleWars 2009

Time flies! ❤️